Production & Delivery
- Ready to ship in 2 business days.
- Delivered within 3–5 business days.
Paper Details
- FSC® certified (FSC-C006462)
- 110 lb cover
- 17pt 350gsm
Templates
Pricing
- 100 for $38
- 200 for $42
- Free Shipping via FedEx
Best Finishing
Foil & Rounded Corner
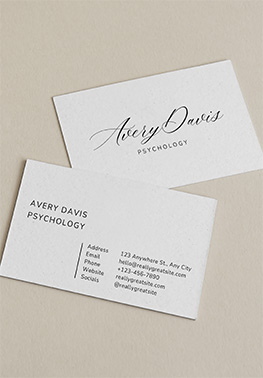
Extra Nouveau Business Card #110 (350 GSM)
Printing Cost |
US $0 |
|
Finishing Cost |
US $0 |
Delivery Cost |
US $0 |
Total Amount |
|
US $0 |
|
- Printing: 35 USD /
- Finishing: 5 USD /
- Discount: 0 USD /
- Total Amount: 40 USD
Superior Quality and Elegant Feel of Lakepaper Extra Nouveau The Ultimate Choice
Elegant Finish:
The extra matte surface provides a sophisticated and non-reflective finish, enhancing the readability and visual appeal of printed materials.
Luxurious Texture:
The smooth and tactile feel of Lakepaper Extra Nouveau adds a touch of luxury to any project, making it ideal for high-end brochures, invitations, and other premium print products.
Eco-Friendly:
Lakepaper Extra Matte is often produced with sustainable practices and materials, making it a more eco-friendly option for those conscious of their environmental impact
Professional Appeal:
The refined appearance and feel of Lakepaper Extra Matte convey a sense of professionalism and quality, making it a popular choice for businesses and creatives looking to make a strong impression.Specifications
| Application examples | Packaging, cards, cover, business equipment |
| Printing | Offset printing, Letterpress, Digital printing (dry toner), Silk-screen printing, Blind embossing, Hot foil stamping, Paper engraving, Die cutting |
| Certifications | Lakepaper Eco certification, FSC certified (FSC C006462) |
Due to its low ink absorption rate, this paper produces lighter colors when compared to coated paper.
Size Information
Artwork Requirements
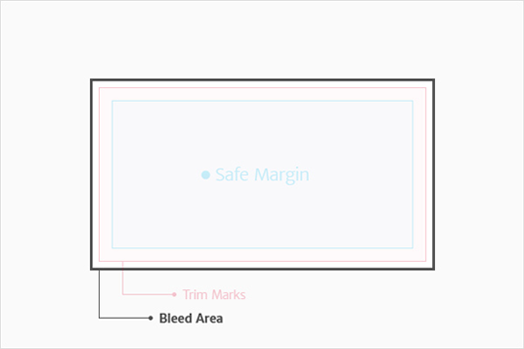
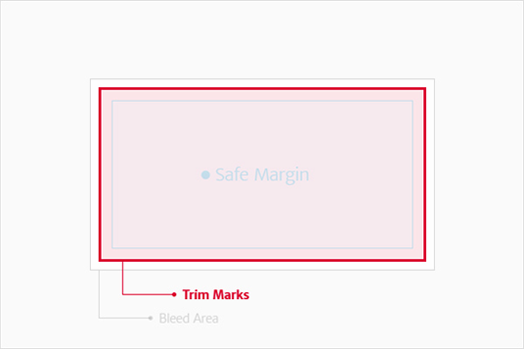
Bleed and Safe Zone Guidelines
To ensure that your design is printed exactly as intended, it's important to understand how bleed and safe zones work in print production.
The bleed area is the portion of your design that extends beyond the final trim size. This extra area (typically 0.125" / 3mm on each side) ensures that there are no white edges after cutting. Make sure that any background colors or images that should go to the edge of the paper extend into this bleed area.
The safe zone is the area inside the trim line where all critical elements—such as logos, text, and important graphics—should be placed. We recommend keeping these elements at least 0.125" / 3mm inside the edge to avoid being cut off during the trimming process.
If you are using a template, be sure to align your content properly within the bleed and safe zones. If you're not sure, our team is here to help you review your file and make sure it's print-ready.
Resolution and Printing Guidelines
For optimal print quality, all artwork should be created at a resolution of 300 DPI (dots per inch). This standard ensures that all design elements, including images, logos, and text, appear crisp, clean, and professional in the final printed product.
Avoid using low-resolution images, especially those sourced from websites, as they are typically only 72 DPI and intended for digital screens — not for print. Even if such images look sharp on your monitor, they will most likely appear pixelated, blurry, or distorted when printed at full size.
Important: Simply increasing the size or resolution of a low-quality image using design software will not improve its print quality. Enlarging a low-resolution image only stretches the existing pixels, leading to further image degradation.
We strongly recommend setting your document resolution to 300 DPI from the very beginning of your design process. When working with vector-based files such as AI, PDF, or EPS, make sure any placed or embedded raster images also meet the 300 DPI standard. A single low-resolution element can compromise the overall appearance of your printed material.
If you're unsure whether your file meets the resolution requirements, please don't hesitate to contact us. We are happy to review your file and offer guidance to ensure the best possible print results.
Fonts and Images Guidelines
To avoid font issues during printing, it's essential to convert all text in your artwork to outlines or curves. This ensures that your fonts appear exactly as designed, regardless of the system used during production.
Why it matters: Missing or incompatible fonts can cause layout shifts or incorrect rendering. Outlining prevents this by transforming text into vector shapes.
Do not rely on attaching font files separately. Fonts may be restricted by licensing or get lost during transfer. Always outline your text before exporting.
Likewise, all images should be embedded directly into your file — not linked. Linked images may not be included when the file is transferred, resulting in blank areas in your final print.
Before submitting your file:
1. Make sure all text is outlined.
2. Ensure all placed images are embedded.
3. Double-check your layout for consistency.
If you're unsure how to convert fonts or embed images, follow the software-specific steps below. If you still need help, don't hesitate to contact us — we're happy to assist you.
How to Convert Text to Outlines:
Adobe Illustrator
1. Select all text.
2. Go to Type > Create Outlines (or press Ctrl+Shift+O / Cmd+Shift+O).
3. Save the file as AI or PDF.
Adobe InDesign
1. Export as a high-resolution PDF.
2. Open in Illustrator to outline the text.
3. Or during export, enable Embed all fonts in the PDF settings.
Adobe Photoshop
1. Use 300 DPI canvas.
2. Flatten all text layers.
3. Or right-click text layer > Convert to Shape.
CorelDRAW
1. Select the text.
2. Press Ctrl+Q or go to Arrange > Convert to Curves.
Affinity Designer
1. Select the text object.
2. Go to Layer > Convert to Curves.
How to Embed Images:
Adobe Illustrator
1. Open Window > Links panel.
2. Select the image name.
3. Choose Embed Image from the menu.
Adobe InDesign
1. Go to the Links panel.
2. Select the image > menu icon > Embed Link.
3. When exporting, use High Quality Print preset and check Embed Images.
Adobe Photoshop
Images are embedded by default. If using Smart Objects, right-click and select Convert to Embedded.
CorelDRAW
Use File > Save As and check Include image files, or use File > Prepare for Service Bureau.
Affinity Designer
1. Use File > Place to insert images.
2. Right-click the image > Embed.
3. Check embed status in the Layers panel.
Color
We use the industry-standard CMYK 4-color process for all of our printing. This method blends four base ink colors — Cyan, Magenta, Yellow, and Black (Key) — to produce a wide spectrum of full-color results.
Please note that we do not support PMS (Pantone Matching System) or Spot color printing. These specialized inks are typically used for exact brand color matching or for printing metallic and fluorescent colors, which are not available through standard CMYK.
If your project requires precise color consistency — such as corporate brand colors or Pantone-specific hues — please be aware that converting these to CMYK may result in slight color shifts.
We recommend requesting a printed proof in advance or contacting us if accurate color matching is critical to your design. We're here to help ensure your print looks its best.
RGB & CMYK Color
All artwork, designs, and images must be provided in CMYK color mode before submission. CMYK — which stands for Cyan, Magenta, Yellow, and Black (Key) — is the standard color model used in professional printing.
Files submitted in RGB color mode (typically used for digital screens) may appear significantly different when printed, as RGB colors often fall outside the printable CMYK color gamut.
To ensure color accuracy and consistency, please convert all files to CMYK before exporting or uploading. This includes all embedded images, linked graphics, and raster elements.
If your file is submitted in RGB, we will convert it to CMYK for printing — however, color shifts may occur. We strongly recommend reviewing a soft proof or requesting a printed sample if precise color reproduction is important to your project.
Supported File Formats
| Adobe Illustrator (*.ai, *.eps) | |
| Adobe Photoshop (*.tif, *.jpg, *.jpeg, *.psd, *.bmp) | |
| Adobe Acrobat (*.pdf) |
Download Business Card Template
Business Cards by Paper Stock
Matte Silk Laminated
- Matte Laminated (19pt)
- Matte Laminated (17pt)
- Matte Laminated (17pt)+Spot UV
- Matte Laminated (12pt)
- Matte Laminated (10pt)
Uncoated Premium
Euro Business Cards
Velvet Business Cards
Special Finishing
- Spot UV Business Card
- Raised Spot UV Business Cards
- Raised Gold Foil Business Cards
- Foil Business Card
- Edge Foiling Business Cards
- Rounded Corner Business Card
- Raised Ink Business Card
- Linen Business Card
- Blind Embossed Business Card
- Folded Business Card
- Landscape Folded Business Card
- White Ink Business Card
- Letterpress Business Card
- Shaped Business Cards
- Laser Cut Business Cards
- Low Price Raised Ink Business Cards
- Rounded Corner Hologram Gloss Card
- Star Hologram Cards
- Black Paper Foil Cards
Special Business Cards
- Linen #70
- Nouveau #80
- Vent Nouveau
- Grace #70
- Mashmallow #70
- Yupo #65
- Village #80
- Scotland #90
- Unlaminated (12pt)
- Brown Kraft #90