Auto Dealer Business Card
Auto Dealer Business Card
Our premium business cards are perfect for any new or used car dealership, or car salesman who wants to make a lasting impression. If you work for companies like Tesla, Audi, Hyundai, Kia etc. you want to have a business card that reflects the professionalism and quality of your auto dealership, and their respective parent company. Our business cards are also great for gas stations, electric charging stations, and anything else in the automotive and electric vehicle industry. They come in multiple sizes, and have different corner styling options and foil finishes, so you can customize your business card however you like. If you don’t have design experience, that won’t be a problem! We have free downloadable templates for you to use, and we also offer design services. Order business cards today and enjoy free world-wide shipping! Please send specifications to info@aladdinprint.com to get a free quotation.
Browse business card designs.
Customizable, free design templates ready
Auto Sales Business Cards
Automotive Business Cards
Car Dealer Business Cards
Car Sales Business Cards
Car Salesman Business Cards
The largest car companies
- Hyundai
- Volkswagen
- Toyota
- Daimler
- Ford Motor
- Honda
- General Motors
- SAIC
- BMW
- Nissan
- FAW Group
- Dongfeng
- Peugeot
- BAIC Group
- Renault
- GAC Group
- Kia
- Geely
- Volvo
- Tata
Available Sizes
- 3.5" x 2"
- 3.5" x 1.75"
- 2.5" x 2.5"
- 85 x 55 mm (European Business Card Size)
- 90 x 55 mm (Australia & New Zealand Size)
- Download Templates
Price
250 : $35 / 500 : $36 / 1000 : $41
Free Shipping
Best Finishing
Foil & Rounded Corner
Printing Cost |
US $0 |
|
Finishing Cost |
US $0 |
Delivery Cost |
US $0 |
Total Amount |
|
US $0 |
|
- Printing: 35 USD /
- Finishing: 5 USD /
- Discount: 0 USD /
- Total Amount: 40 USD
Size Information
Artwork Requirements
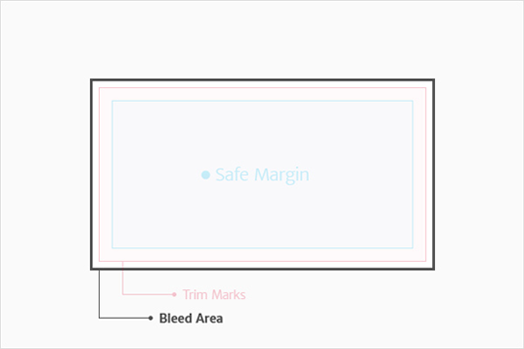
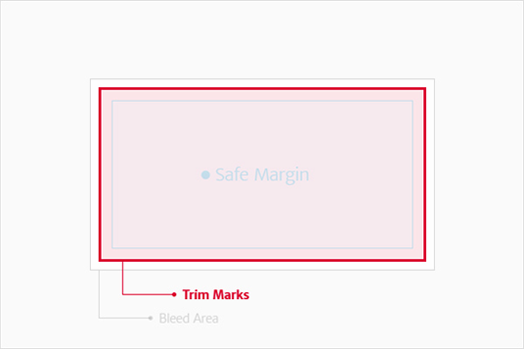
Bleed and Safe Zone Guidelines
To ensure that your design is printed exactly as intended, it's important to understand how bleed and safe zones work in print production.
The bleed area is the portion of your design that extends beyond the final trim size. This extra area (typically 0.125" / 3mm on each side) ensures that there are no white edges after cutting. Make sure that any background colors or images that should go to the edge of the paper extend into this bleed area.
The safe zone is the area inside the trim line where all critical elements—such as logos, text, and important graphics—should be placed. We recommend keeping these elements at least 0.125" / 3mm inside the edge to avoid being cut off during the trimming process.
If you are using a template, be sure to align your content properly within the bleed and safe zones. If you're not sure, our team is here to help you review your file and make sure it's print-ready.
Resolution and Printing Guidelines
For optimal print quality, all artwork should be created at a resolution of 300 DPI (dots per inch). This standard ensures that all design elements, including images, logos, and text, appear crisp, clean, and professional in the final printed product.
Avoid using low-resolution images, especially those sourced from websites, as they are typically only 72 DPI and intended for digital screens — not for print. Even if such images look sharp on your monitor, they will most likely appear pixelated, blurry, or distorted when printed at full size.
Important: Simply increasing the size or resolution of a low-quality image using design software will not improve its print quality. Enlarging a low-resolution image only stretches the existing pixels, leading to further image degradation.
We strongly recommend setting your document resolution to 300 DPI from the very beginning of your design process. When working with vector-based files such as AI, PDF, or EPS, make sure any placed or embedded raster images also meet the 300 DPI standard. A single low-resolution element can compromise the overall appearance of your printed material.
If you're unsure whether your file meets the resolution requirements, please don't hesitate to contact us. We are happy to review your file and offer guidance to ensure the best possible print results.
Fonts and Images Guidelines
To avoid font issues during printing, it's essential to convert all text in your artwork to outlines or curves. This ensures that your fonts appear exactly as designed, regardless of the system used during production.
Why it matters: Missing or incompatible fonts can cause layout shifts or incorrect rendering. Outlining prevents this by transforming text into vector shapes.
Do not rely on attaching font files separately. Fonts may be restricted by licensing or get lost during transfer. Always outline your text before exporting.
Likewise, all images should be embedded directly into your file — not linked. Linked images may not be included when the file is transferred, resulting in blank areas in your final print.
Before submitting your file:
1. Make sure all text is outlined.
2. Ensure all placed images are embedded.
3. Double-check your layout for consistency.
If you're unsure how to convert fonts or embed images, follow the software-specific steps below. If you still need help, don't hesitate to contact us — we're happy to assist you.
How to Convert Text to Outlines:
Adobe Illustrator
1. Select all text.
2. Go to Type > Create Outlines (or press Ctrl+Shift+O / Cmd+Shift+O).
3. Save the file as AI or PDF.
Adobe InDesign
1. Export as a high-resolution PDF.
2. Open in Illustrator to outline the text.
3. Or during export, enable Embed all fonts in the PDF settings.
Adobe Photoshop
1. Use 300 DPI canvas.
2. Flatten all text layers.
3. Or right-click text layer > Convert to Shape.
CorelDRAW
1. Select the text.
2. Press Ctrl+Q or go to Arrange > Convert to Curves.
Affinity Designer
1. Select the text object.
2. Go to Layer > Convert to Curves.
How to Embed Images:
Adobe Illustrator
1. Open Window > Links panel.
2. Select the image name.
3. Choose Embed Image from the menu.
Adobe InDesign
1. Go to the Links panel.
2. Select the image > menu icon > Embed Link.
3. When exporting, use High Quality Print preset and check Embed Images.
Adobe Photoshop
Images are embedded by default. If using Smart Objects, right-click and select Convert to Embedded.
CorelDRAW
Use File > Save As and check Include image files, or use File > Prepare for Service Bureau.
Affinity Designer
1. Use File > Place to insert images.
2. Right-click the image > Embed.
3. Check embed status in the Layers panel.
Color
We use the industry-standard CMYK 4-color process for all of our printing. This method blends four base ink colors — Cyan, Magenta, Yellow, and Black (Key) — to produce a wide spectrum of full-color results.
Please note that we do not support PMS (Pantone Matching System) or Spot color printing. These specialized inks are typically used for exact brand color matching or for printing metallic and fluorescent colors, which are not available through standard CMYK.
If your project requires precise color consistency — such as corporate brand colors or Pantone-specific hues — please be aware that converting these to CMYK may result in slight color shifts.
We recommend requesting a printed proof in advance or contacting us if accurate color matching is critical to your design. We're here to help ensure your print looks its best.
RGB & CMYK Color
All artwork, designs, and images must be provided in CMYK color mode before submission. CMYK — which stands for Cyan, Magenta, Yellow, and Black (Key) — is the standard color model used in professional printing.
Files submitted in RGB color mode (typically used for digital screens) may appear significantly different when printed, as RGB colors often fall outside the printable CMYK color gamut.
To ensure color accuracy and consistency, please convert all files to CMYK before exporting or uploading. This includes all embedded images, linked graphics, and raster elements.
If your file is submitted in RGB, we will convert it to CMYK for printing — however, color shifts may occur. We strongly recommend reviewing a soft proof or requesting a printed sample if precise color reproduction is important to your project.
Supported File Formats
| Adobe Illustrator (*.ai, *.eps) | |
| Adobe Photoshop (*.tif, *.jpg, *.jpeg, *.psd, *.bmp) | |
| Adobe Acrobat (*.pdf) |
Download Business Card Template
Commercial Real Estate Brokers Guide to Printing Impactful Business Cards
Business cards are the smallest, but oftentimes most important, piece of marketing collateral a commercial real estate Broker has at his or her disposal. It not only visually defines a level of competency and professionalism; it reminds people why they should hire you.
The following are 5 things all commercial real estate Brokers should pay attention to when designing and printing their business cards. These will help you create the most impactful business cards to generate, and maintain, commercial real estate business opportunities.
5 Tips For Commercial Real Estate Brokers on How to Print Impactful Business Cards
A commercial real estate Brokers’ knock on the deal door, here’s our best tips for designing and printing business cards that leave an impact…and generate a response.
Keep It Simple, Yet Memorable…and On Brand
In today’s digital printing world you can get whatever you want on your business cards. From custom shapes to foils to embossments to holograms, nothing is out of reach and there are several ways to stand out from the crowd. The key for commercial real estate Brokers is to be memorable, but for the right reasons. This means keeping it simple, subtle and being choosey.When designing your business cards there are several trendy colors and fonts at your disposal, but keep in mind that all information needs to be legible. Keep the layout simple with plenty of white space to properly display your contact information. This means not shrinking down your phone, website and email to font size 5 because you ran out of room. No one can read that, and no one wants to.
Also, be cognizant of staying on brand. Your business card is an extension of your family of marketing collateral (website, property flyer, OM, company brochure) and should include the logo, colors and fonts identified with your corporate brand.
The Right Information
The entire purpose of your business card is to generate leads. Knowing this, make sure to include all of the necessary information someone would need to contact you.This will always include:
- - Company Logo
- - Broker Name
- - Broker Title (If you specialize in a particular sector, make sure it is included, i.e. Multifamily Investment Specialist)
- - Phone Number (Office and Mobile)
- - Email Address
- - Physical Address (If applicable)
- - Website Address
- - Social Media Handles (If you are active on those accounts)
- - Copyright and Trademark Symbols
- - Certification Logos (CCIM, CPM, SIOR, CRE, MAI, etc.)
- - License Information (If applicable by law in your state)
Blank Isn’t Bad
Business cards come with two-sides, and both are an opportunity to express your professional self. As individuals in the sales industry it is always suggested that commercial real estate Brokers keep the second side of their card as empty as possible. Why? Without fail, you will at one point end up writing something on the other side.Whether a number to a build-out contractor, a lease price, or an address of a comparable listing - trust us you will write in that space. If there is a dark background or crazy design/pattern on the back, you will lose this opportunity. So, keep it light and mostly unencumbered. A great suggestion would be placing your company logo and/or certification logos on the back, which can still afford you plenty of blank space.
Size Matters
A simple way to differentiate yourself is to use a non-standard business card size when you print. Most reputable business card printers will offer the below size options.- - 3.5" x 2" (Traditional Business Card Size)
- - 3.5" x 1.75" (Longer Rectangle)
- - 2.5" x 2.5" (Square)
- - 85 x 55 mm (European Business Card Size)
- - 90 x 55 mm (Australia & New Zealand Size)
While it also comes down to layout, graphics, colors and information, there is something to be said about a business card that most literally does not fit into that pile of cards we call keep in our desk. Whether it is a square or thin rectangle, these non-traditional sized cards make a habit of falling out of the pile…and jumping to the forefront.
Cut Your Corners
As you have learned by now, standing out best involves small, subtle changes. One of the most popular is to print business cards with rounded corners. This provides commercial real estate Brokers an easy way to stand out without sacrificing clean layout or losing necessary information.This subtle difference that will be an option at any quality-printing provider. Since we get asked, yes, rounded corners are still the same size as standard business cards and will fit into any holder or wallet.
It All Ends with the Printer
Now that you have designed the best layout, chosen the perfect colors and added subtle flair it’s time for the finished product! With all this hard design work commercial real estate Brokers shouldn’t drop the ball on the 1-yard line by choosing an inexpensive and unreliable printer. Trust us, printing matters.To ensure the best final product make sure you use a commercial printer who offers high quality paper stock with extensive weight options and textures, embossing, spot UV, foil stamping and any other finishing options that you may want. The old adage is true; you get what you pay for, so seek out a large printing operation that offers quick turnaround and great customer service. Good luck and go get those deals!
- by Joshua Lyons
Business Cards by Paper Stock
Matte Silk Laminated
- Matte Laminated (19pt)
- Matte Laminated (17pt)
- Matte Laminated (17pt)+Spot UV
- Matte Laminated (12pt)
- Matte Laminated (10pt)
Uncoated Premium
Euro Business Cards
Velvet Business Cards
Special Finishing
- Spot UV Business Card
- Raised Spot UV Business Cards
- Raised Gold Foil Business Cards
- Foil Business Card
- Edge Foiling Business Cards
- Rounded Corner Business Card
- Raised Ink Business Card
- Linen Business Card
- Blind Embossed Business Card
- Folded Business Card
- Landscape Folded Business Card
- White Ink Business Card
- Letterpress Business Card
- Shaped Business Cards
- Laser Cut Business Cards
- Low Price Raised Ink Business Cards
- Rounded Corner Hologram Gloss Card
- Star Hologram Cards
- Black Paper Foil Cards
Special Business Cards
- Linen #70
- Nouveau #80
- Vent Nouveau
- Grace #70
- Mashmallow #70
- Yupo #65
- Village #80
- Scotland #90
- Unlaminated (12pt)
- Brown Kraft #90